Introduction
There’s something undeniably magical about the aroma of freshly baked bread wafting through your home. It’s a scent that evokes comfort, warmth, and a sense of timeless tradition. In a world of fleeting trends and instant gratification, the simple act of baking a classic loaf of bread remains a deeply satisfying and rewarding experience. This isn’t just about food; it’s about connecting with a culinary heritage, creating something wholesome with your own hands, and sharing a piece of your heart with those you love. Forget complicated techniques and obscure ingredients – this recipe is a celebration of simplicity, designed to bring the joy of authentic, homemade bread to every kitchen.
Our “Classic Homemade Bread” recipe focuses on the fundamentals, transforming basic pantry staples into a masterpiece of golden crust and tender, airy crumb. This isn’t a sourdough starter that demands weeks of nurturing, nor a quick bread that sacrifices texture for speed. Instead, it’s a reliable, no-fuss yeast bread that respects the natural processes of fermentation and gluten development. The result is a loaf that is both rustic and refined, perfect for slathering with butter, building hearty sandwiches, or simply tearing apart and enjoying with a good meal. It’s the kind of bread that begs to be made repeatedly, becoming a cherished staple in your home baking repertoire.
What makes this bread truly “classic” is its straightforward approach and universal appeal. We’re using high-quality, readily available ingredients and time-honored techniques that have been passed down through generations. From activating the yeast to the satisfying knead, the patient rise, and finally, the transformative heat of the oven, each step is designed to be approachable for beginners while still delivering a superior product that even seasoned bakers will appreciate. Prepare to fill your home with an irresistible aroma and your table with a loaf that tastes like pure comfort – a true testament to the enduring power of classic homemade bread.
Nutritional Information
Per serving (approximate values):
- Calories: 220
- Protein: 8g
- Carbohydrates: 40g
- Fat: 3g
- Fiber: 2g
- Sodium: 350mg
Ingredients
- 4 cups (500g) bread flour, plus more for dusting
- 2 teaspoons (7g) active dry yeast
- 2 teaspoons (12g) fine sea salt
- 1 ½ cups (360ml) warm water (105-115°F / 40-46°C)
- 2 tablespoons (30ml) olive oil, plus extra for greasing the bowl
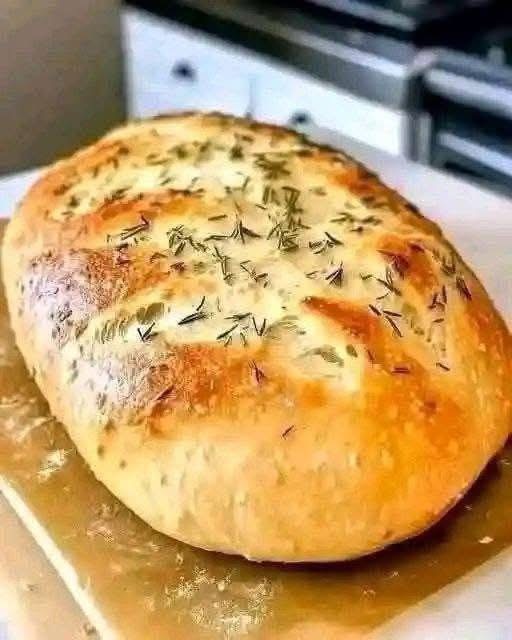
- 1 tablespoon fresh rosemary, finely chopped (optional)
Instructions
- Activate the Yeast: In a large mixing bowl, combine the warm water and yeast. Stir gently and let it sit for 5-10 minutes until the mixture becomes foamy. This indicates the yeast is active and ready to work. If it doesn’t foam, your yeast may be old or the water temperature was too cold/hot, and you should start again with fresh yeast.
- Combine Dry Ingredients:In a separate medium bowl, whisk together the bread flour and salt. If using, stir in the chopped fresh rosemary at this stage, ensuring it’s evenly distributed throughout the flour.
- Form the Dough: Add the olive oil to the foamy yeast mixture. Gradually add the flour mixture to the wet ingredients, mixing with a wooden spoon or your hands until a shaggy, cohesive dough forms. Make sure all the flour is incorporated.
- Knead the Dough: Turn the dough out onto a lightly floured surface. Knead the dough for 8-10 minutes. Use the heel of your hand to push the dough away from you, then fold it back over itself, rotate, and repeat. The dough should become smooth, elastic, and less sticky. To check for proper kneading, perform the “windowpane test”: gently stretch a small piece of dough. If it stretches thin enough to see light through it without tearing, it’s ready.
- First Rise (Bulk Fermentation): Lightly grease a large clean bowl with olive oil. Place the kneaded dough into the bowl, turning it once to coat the entire surface with oil. Cover the bowl tightly with plastic wrap or a clean kitchen towel. Place the bowl in a warm, draft-free place (such as a turned-off oven with the light on, or a proofing box) for 1 to 1.5 hours, or until the dough has doubled in size. The exact time will depend on the temperature of your environment.
- Punch Down and Shape:Once doubled, gently punch down the dough to release the air. Turn the dough out onto a lightly floured surface. Gently form it into your desired loaf shape (a round boule or an oblong bâtard). For an oblong loaf, gently pat the dough into a rectangle, fold the top third down to the center, then the bottom third up and over, sealing the seam. Then, fold it in half lengthwise and pinch the seam firmly. Roll it gently to create an even log.
- Second Rise (Proofing):Transfer the shaped dough to a parchment paper-lined baking sheet or a floured proofing basket (banneton). If using a baking sheet, cover the dough loosely with plastic wrap or a clean kitchen towel. Let it rise in a warm, draft-free place for another 30-45 minutes, or until it has nearly doubled in size and feels light and airy. To test if it’s ready, gently poke the dough with a floured finger; if the indentation springs back slowly, it’s ready to bake. If it springs back immediately, it needs more time. If it doesn’t spring back at all, it’s over-proofed.
- Preheat Oven & Score:While the dough is on its second rise, preheat your oven to 450°F (230°C) with a baking stone or heavy baking sheet inside for at least 30 minutes. Just before baking, use a very sharp knife or a bread lame to make 2-3 shallow slashes on the top of the loaf. This allows the steam to escape and prevents uncontrolled tearing, creating a beautiful crust.
- Bake the Bread: Carefully transfer the dough (on the parchment paper) to the hot baking stone or baking sheet in the oven. For a crispier crust, you can create steam in the oven by pouring about ½ cup of hot water into a cast-iron pan or an old metal pan on the bottom rack of the oven immediately after placing the bread in. Be very careful of the steam.
- Baking Time: Bake for 20-25 minutes, then reduce the oven temperature to 400°F (200°C) and continue baking for another 15-20 minutes, or until the crust is deeply golden brown and the internal temperature of the bread reaches 200-210°F (93-99°C) when measured with an instant-read thermometer.
- Cool: Remove the bread from the oven and transfer it to a wire rack to cool completely before slicing. This is crucial for the internal structure to set and prevents a gummy texture. Resist the urge to cut into it too soon!
Cooking Tips and Variations
Achieving the Perfect Crust: For an extra crispy crust, create steam in your oven during the initial baking phase. You can do this by placing a shallow metal pan on the bottom rack of your oven while it preheats. When you put the bread in, carefully pour about ½ cup of hot water into the hot pan. Close the oven door quickly to trap the steam. This helps the crust develop a beautiful sheen and crispness. Another trick is to mist the inside of the oven with water from a spray bottle a few times in the first 10 minutes of baking.
The Importance of Cooling: It might be tempting to slice into that warm, fragrant loaf right out of the oven, but patience is a virtue here. Allowing the bread to cool completely on a wire rack allows the internal starches to set, preventing a gummy texture and ensuring the crumb is airy and well-structured. Cutting it too soon can result in a dense, moist interior.
Troubleshooting Your Dough:
- Dough Not Rising: This is almost always due to inactive yeast or incorrect water temperature. Ensure your yeast is fresh (check the expiration date) and your water is between 105-115°F (40-46°C). Too cold, and the yeast won’t activate; too hot, and it will kill the yeast.
- Sticky Dough: If your dough is too sticky to handle, add a very small amount of flour (a tablespoon at a time) during kneading until it becomes manageable. Avoid adding too much, as this can make the bread dense.
- Dense Bread: This can be caused by under-proofing (not allowing enough rise time), over-kneading (which can tighten the gluten too much), or too much flour. Ensure your dough doubles in size during both rises and feels light and airy.
Variations to Experiment With:
- Herb Infusion: Beyond rosemary, try adding 1-2 tablespoons of other fresh herbs like thyme, oregano, or a mix of Italian herbs. You can also mix in 1 teaspoon of dried herbs if fresh isn’t available.
- Cheesy Delight: Fold in ½ cup of shredded hard cheese like Parmesan, Gruyere, or sharp cheddar during the last minute of kneading for a savory loaf.
- Seed Power: Incorporate 2-3 tablespoons of seeds such as sesame, poppy, flax, or sunflower seeds into the dough during kneading. You can also sprinkle them on top before baking for added texture and visual appeal.
- Whole Wheat Blend: For a heartier loaf, substitute up to 1 cup of the bread flour with whole wheat flour. You might need to add an extra tablespoon or two of water as whole wheat flour absorbs more liquid.
- Garlic & Onion: Sauté 2 cloves of minced garlic and 1/4 cup of finely diced onion until softened, then cool completely before adding to the dough during the last few minutes of kneading.
Storage and Reheating
Storing Your Freshly Baked Bread: The best way to store classic homemade bread to maintain its freshness is at room temperature. Once completely cooled, store the loaf in a paper bag to allow air circulation and prevent the crust from becoming soft. You can also place it in a bread box. Avoid storing bread in the refrigerator, as this tends to dry it out and make it stale much faster due to a process called “starch retrogradation.” Fresh bread typically stays good for 2-3 days when stored properly at room temperature.
Extending Freshness (Beyond 3 Days): If you won’t be finishing the loaf within a few days, freezing is your best option. To freeze, allow the bread to cool completely. You can freeze it whole, halved, or sliced. For slices, it’s best to pre-slice the loaf and then place a piece of parchment paper between each slice to prevent them from sticking together. Wrap the bread tightly in plastic wrap, then an additional layer of aluminum foil, or place it in a freezer-safe bag. This double layer of protection helps prevent freezer burn. Frozen bread can be stored for up to 2-3 months.
Reheating Frozen Bread:
- Whole or Half Loaf: To reheat a whole or half frozen loaf, remove it from the freezer and unwrap it. Place it directly into a cold oven, then set the temperature to 350°F (175°C). Bake for 20-30 minutes, or until warmed through and the crust is crisp again. The gradual heating prevents the crust from burning before the inside thaws.
- Slices: Individual frozen slices can be popped directly into a toaster for a few minutes until golden and warmed through. Alternatively, you can place them on a baking sheet and heat in a preheated oven at 350°F (175°C) for 5-10 minutes.
Reheating Stale Bread: If your bread has gone a little stale but isn’t moldy, you can often revive it. Briefly dampen the crust (you can run it quickly under the tap or spray it with water) and then place it in a preheated oven at 300-350°F (150-175°C) for 5-10 minutes. The moisture will turn to steam, softening the crumb and crisping up the crust. Enjoy immediately.
Frequently Asked Questions
Why is my bread dense and not airy?
A dense loaf often points to issues with proofing or kneading. Either the dough didn’t get enough time to rise (under-proofed), or it rose too much and then collapsed (over-proofed). It can also result from not kneading enough, which means the gluten hasn’t developed sufficiently to trap the gases, or conversely, over-kneading, which can tighten the gluten structure too much. Ensure your yeast is active, your water temperature is correct for activation, and that you let the dough double in size for both rises. For kneading, aim for a smooth, elastic dough that passes the “windowpane test.”
Can I make this recipe without a stand mixer?
Absolutely! This recipe is perfectly suited for hand-kneading. In fact, many bakers prefer hand-kneading as it allows you to feel the dough’s development and adjust as needed. The kneading time will be approximately 8-10 minutes by hand, potentially a little longer than with a stand mixer, but the technique remains the same: push, fold, rotate, and repeat until the dough is smooth and elastic.
What is the best way to tell if the bread is fully baked?
The most reliable way to tell if your bread is fully baked is by checking its internal temperature with an instant-read thermometer. For a classic loaf, you want the internal temperature to be between 200-210°F (93-99°C). Visually, the crust should be a deep golden brown, and when you tap the bottom of the loaf, it should sound hollow. If it doesn’t sound hollow or the temperature is too low, return it to the oven for a few more minutes.
Why is scoring the dough important?
Scoring, or slashing the top of the dough before baking, serves a crucial purpose. As the bread bakes, the sudden heat of the oven causes a rapid expansion of gases inside the dough, known as “oven spring.” Without scores, the crust will rupture in uncontrolled places, leading to an uneven and often less attractive loaf. Scores provide a controlled path for the dough to expand, preventing uncontrolled tearing and allowing the bread to achieve its maximum volume and a beautiful, intentional appearance. It also contributes to the characteristic crust development.