Introduction
Prepare to be enchanted by a dessert that’s as stunning to behold as it is delightful to devour: our Chocolate Cake with Creamy Filling. This isn’t just any chocolate cake; it’s a masterpiece of rich, decadent chocolate sponge layered with a luxuriously smooth, creamy filling, all beautifully presented with an elegant design that will impress at any gathering. Forget complicated bakery creations; this recipe brings gourmet elegance right into your home kitchen, proving that making something truly spectacular can be easier than you think.
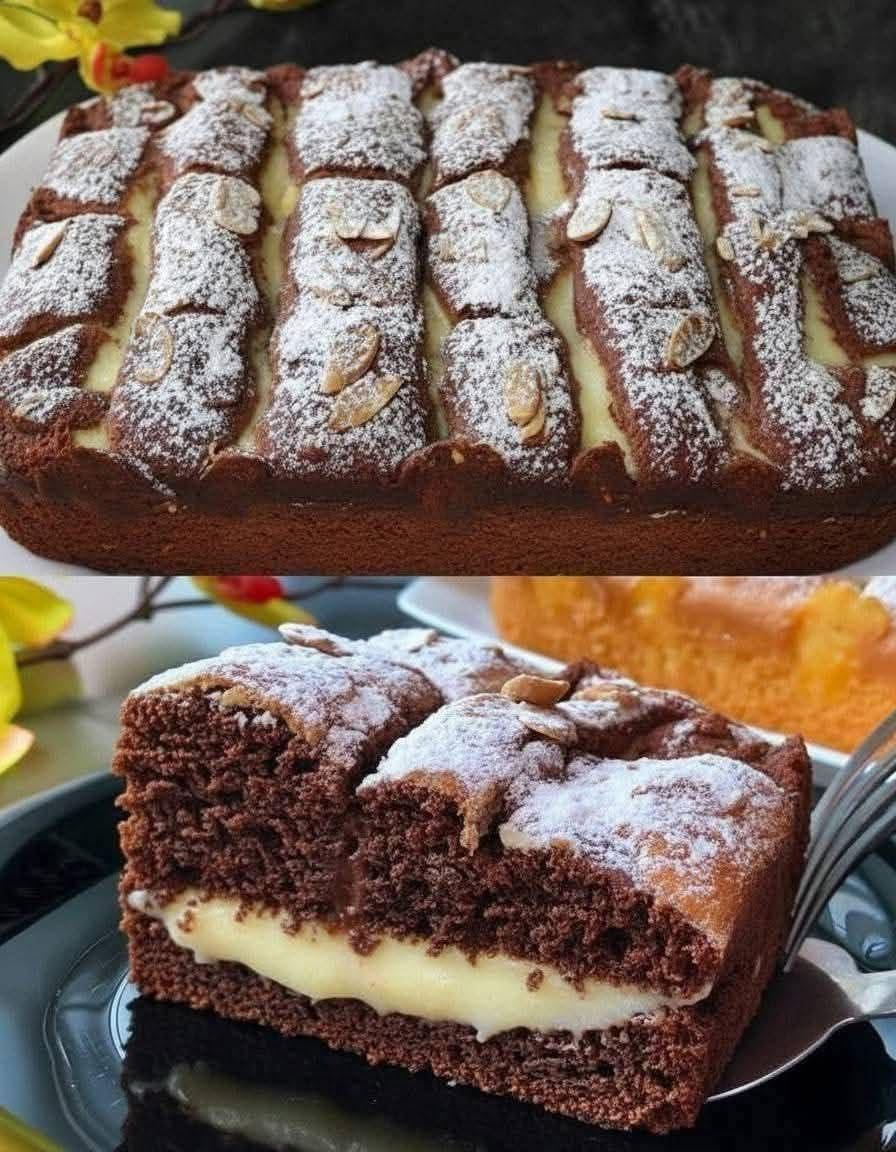
What makes this cake so special is the harmonious blend of textures and flavors. The deep, intense chocolate cake provides a robust base, perfectly complemented by the light, airy, and subtly sweet cream. Each bite offers a symphony of cocoa and dairy, a classic combination that never fails to satisfy. The distinctive cut sections filled with cream not only add a unique visual appeal but also ensure a perfect ratio of cake to filling in every slice, making it an absolute joy to eat.
Whether you’re celebrating a special occasion, treating your loved ones, or simply indulging in a moment of pure bliss, this Chocolate Cake with Creamy Filling is your go-to recipe. We’ll guide you through every step, from baking the perfect chocolate cake to whipping up the dreamy filling and assembling it into a show-stopping dessert. Get ready to bake a cake that will earn you rave reviews and become a cherished addition to your recipe repertoire!
Nutritional Information
Per serving (approximate values):
- Calories: 450
- Protein: 6g
- Carbohydrates: 55g
- Fat: 25g
- Fiber: 3g
- Sodium: 320mg
Ingredients
- For the Chocolate Cake:
- 2 cups (250g) all-purpose flour
- 1 ¾ cups (350g) granulated sugar
- ¾ cup (75g) unsweetened cocoa powder, Dutch-processed preferred
- 1 ½ teaspoons baking soda
- 1 teaspoon baking powder
- 1 teaspoon salt
- 1 cup (240ml) buttermilk, room temperature
- ½ cup (120ml) vegetable oil
- 2 large eggs, room temperature
- 1 teaspoon vanilla extract
- 1 cup (240ml) hot water or hot brewed coffee
- For the Creamy Filling:
- 2 cups (480ml) heavy cream, very cold
- ½ cup (60g) powdered sugar, sifted
- 1 teaspoon vanilla extract
- 8 ounces (226g) cream cheese, softened
- ¼ cup (50g) granulated sugar
- For Decoration:
- 2 tablespoons powdered sugar, for dusting
- ¼ cup (25g) sliced almonds, lightly toasted (optional)
Instructions
- Prepare the Chocolate Cake:
- Preheat your oven to 350°F (175°C). Grease and flour a 9×13 inch baking pan, or line with parchment paper.
- In a large bowl, whisk together the flour, granulated sugar, cocoa powder, baking soda, baking powder, and salt.
- Add the buttermilk, vegetable oil, eggs, and vanilla extract to the dry ingredients. Mix on low speed with an electric mixer until just combined, scraping down the sides of the bowl. Do not overmix.
- Carefully pour in the hot water or hot coffee. The batter will be thin. Mix until just incorporated.
- Pour the batter evenly into the prepared baking pan.
- Bake for 30-35 minutes, or until a wooden skewer inserted into the center comes out with a few moist crumbs.
- Let the cake cool in the pan for 10-15 minutes, then invert it onto a wire rack to cool completely. Ensure the cake is fully cooled before proceeding to the next step.
- Prepare the Creamy Filling:
- In a large bowl, using an electric mixer with a whisk attachment, beat the very cold heavy cream, sifted powdered sugar, and vanilla extract on high speed until stiff peaks form. Be careful not to overbeat, or it will turn to butter. Set aside.
- In a separate medium bowl, beat the softened cream cheese and granulated sugar together with an electric mixer until smooth and creamy.
- Gently fold about one-third of the whipped cream into the cream cheese mixture until combined. Then, gently fold in the remaining whipped cream until no streaks remain. Be careful not to deflate the mixture.
- Assemble and Decorate the Cake:
- Once the chocolate cake is completely cool, carefully place it on a large serving platter or cutting board.
- Using a long, sharp serrated knife, very carefully slice off the very top layer of the cake (about ¼ to ½ inch thick), creating a flat surface. This top layer will be used for decoration.
- Next, using a small, sharp knife, cut out small squares or rectangles from the remaining cake base, leaving a 1-inch border around the edges and between each cut. You’ll essentially be creating a grid pattern of empty spaces within the cake, but do not remove the border or the bottom layer of the cake. Gently remove these cut-out cake pieces and set them aside.
- Fill the empty spaces and the top surface of the cake generously with the creamy filling, smoothing it out with an offset spatula.
- Take the small cake pieces you cut out earlier, crumble them gently, and sprinkle them over the creamy filling. You can also crumble the top layer of cake you initially sliced off and use it here for a textured look.
- Dust the entire cake generously with powdered sugar using a fine-mesh sieve.
- If desired, sprinkle toasted sliced almonds over the top for added crunch and visual appeal.
- Refrigerate the cake for at least 1-2 hours before serving to allow the filling to set and the flavors to meld.
Cooking Tips and Variations
For the Perfect Chocolate Cake:
- Don’t Overmix: Overmixing the cake batter can develop the gluten too much, resulting in a tough, dry cake. Mix until just combined.
- Room Temperature Ingredients: Ensure your buttermilk and eggs are at room temperature. This helps them emulsify better with other ingredients, leading to a smoother, more uniform batter and a lighter, fluffier cake.
- High-Quality Cocoa: Use good quality unsweetened cocoa powder. Dutch-processed cocoa gives a darker color and a less acidic, smoother chocolate flavor.
- Hot Liquid: Adding hot water or hot coffee to the batter blooms the cocoa powder, intensifying its flavor and creating a more moist cake. Coffee also subtly enhances the chocolate flavor without making the cake taste like coffee.
- Cool Completely: It’s crucial for the cake to be completely cool before you attempt to slice it or add the filling. A warm cake will crumble and melt your creamy filling.
For the Dreamy Creamy Filling:
- Cold Cream is Key: For the best whipped cream, ensure your heavy cream, bowl, and whisk attachment are very cold. You can even chill your bowl and whisk in the freezer for 10-15 minutes before whipping.
- Don’t Overbeat Whipped Cream: Whip until stiff peaks form, but stop there. Overbeating will turn it grainy or even into butter.
- Softened Cream Cheese:Make sure your cream cheese is truly softened to room temperature. This will prevent lumps in your filling and ensure a smooth, creamy texture.
- Gentle Folding: When combining the whipped cream with the cream cheese mixture, fold gently. This helps maintain the airiness of the whipped cream, resulting in a light and fluffy filling.
- Adjust Sweetness: Feel free to adjust the amount of powdered sugar in the filling to suit your taste.
Design and Assembly Tips:
- Sharp Serrated Knife: Use a long, sharp serrated knife for clean, even cuts when leveling the cake and creating the design.
- Precision Cuts: Take your time when cutting out the inner cake pieces for the design. The more precise your cuts, the neater the final look.
- Dusting: Dust with powdered sugar just before serving. If you dust too early, the sugar can absorb moisture from the cake and disappear.
Variations:
- Flavor Swaps:
- Mint Chocolate: Add ½ teaspoon of peppermint extract to the creamy filling for a refreshing twist.
- Orange Zest: Incorporate the zest of one orange into the cake batter for a vibrant citrus note.
- Nutty Crunch: Instead of or in addition to sliced almonds, try chopped pecans or walnuts for different textures.
- Berries: Tuck fresh raspberries or sliced strawberries into the creamy filling when assembling for a burst of fruity freshness.
- Chocolate Chips: Fold mini chocolate chips into the creamy filling for extra chocolatey goodness.
- Espresso Kick: Add a teaspoon of instant espresso powder to the chocolate cake batter to deepen the chocolate flavor even further.
- Gluten-Free Option:Substitute the all-purpose flour with a high-quality gluten-free all-purpose flour blend (one that contains xanthan gum) for a gluten-free version.
Storage and Reheating
Storage:
- This Chocolate Cake with Creamy Filling is best enjoyed within 2-3 days of preparation.
- Store the cake covered loosely with plastic wrap or in an airtight container in the refrigerator. The creamy filling needs to be kept cold.
- Due to the fresh cream and cream cheese in the filling, it should not be left at room temperature for more than 2 hours.
Reheating:
- This cake is typically served chilled or at cool room temperature; it is not meant to be reheated.
- For optimal flavor and texture, remove the cake from the refrigerator about 15-30 minutes before serving to allow it to come to a slightly cooler room temperature. This enhances the softness of the cake and the creaminess of the filling.
Frequently Asked Questions
Can I make this cake ahead of time?
Yes, you can prepare components of this cake ahead of time. The chocolate cake can be baked and cooled a day in advance, stored tightly wrapped at room temperature. The creamy filling can also be made a day ahead and stored in an airtight container in the refrigerator. Assemble the cake no more than 24 hours before serving for the best texture and freshness.
What if my creamy filling is too thin?
If your creamy filling seems too thin, it’s likely because the heavy cream wasn’t cold enough or wasn’t whipped to stiff peaks, or the cream cheese wasn’t properly softened. If it’s just slightly runny, try chilling it in the refrigerator for at least 30 minutes, then gently re-whipping it for a short period. If it’s very thin, you might need to add a small amount of powdered sugar and re-whip the heavy cream portion separately before gently folding it back into the cream cheese mixture.
Can I use a different size cake pan?
This recipe is designed for a 9×13 inch pan. If you use a different size, you will need to adjust the baking time and potentially the recipe quantity. For example, if using two 8-inch round pans, the baking time might be slightly shorter, and you would likely need to divide the batter evenly. Ensure your pan is deep enough to accommodate the batter without overflowing.
How can I prevent the cake from drying out?
To prevent the chocolate cake from drying out, ensure you do not overbake it. Start checking for doneness at the lower end of the baking time range. A wooden skewer inserted into the center should come out with moist crumbs, not wet batter, and not completely clean. Also, storing the assembled cake properly in an airtight container in the refrigerator helps maintain its moisture.